Calgary Jeep Association

Author Topic: Removal of dashboard and centre console  (Read 766 times)

0 Members and 1 Guest are viewing this topic.

Offline loreleir

  • Stocker
  • Posts: 12
Removal of dashboard and centre console
« on: November 11, 2010, 05:08:28 PM »
How do I go about removing the dashboard and centre console on a 2010 Rubicon Unlimited?

I'm new to this Jeep and just slightly mechanically challenged   :o  It's probably pretty basic, but if anyone can give me some ideas on where to start and what to do, I would greatly appreciate it!

Also, there is a unique bolt pattern on the bolts around the gear shift.  Any idea where I can find a tool to use on them?
'10 Mango Tango Rubicon Unlimited

Offline AV.NINE

  • Talks waaay too much!
  • Posts: 1872
Re: Removal of dashboard and centre console
« Reply #1 on: November 11, 2010, 06:10:11 PM »
If I can remember correctly the bolts around the gear shift (on the plastic ring) aren't real bolts. Just aesthetics.

Its been a while though but If I were you I would search jeepforum.com for your answers.

Why are you removing the dashboard and center console?

Offline w squared

  • Talks waaay too much!
  • Posts: 3400
  • Keamy Hungry!
Re: Removal of dashboard and centre console
« Reply #2 on: November 11, 2010, 06:21:05 PM »
AV.NINE is right. The "bolts" around the shifter are just plastic.

As far as the dashboard goes - are you talking about just the center section? Where the radio is, and below it?

If so what you want to do is start at the end of you "dash top" cover that is closest to the windshield. Pry that up gently, and then the end closest to you will release on it's own. After you do that, you will be able to access the top two bolts that hold the plastic on.
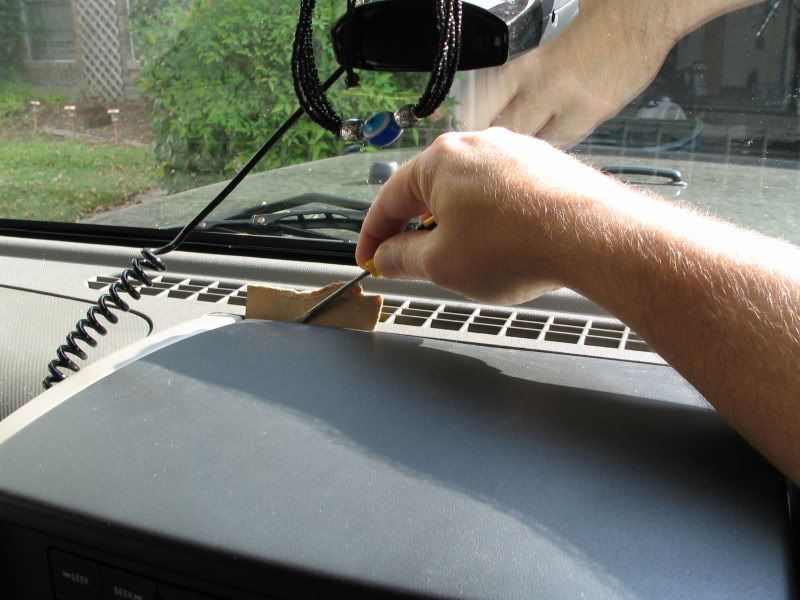

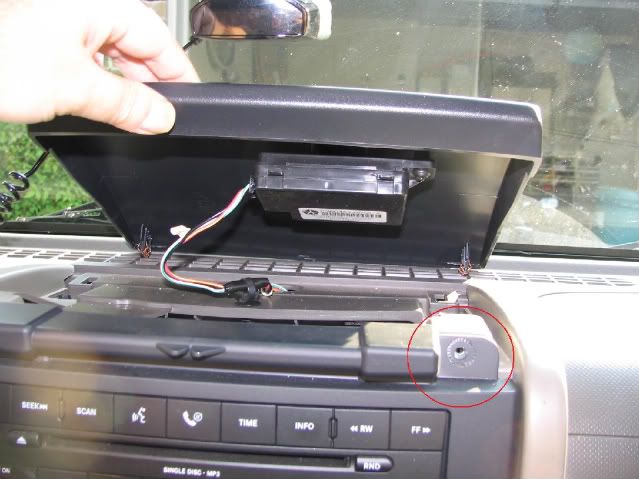


In case my version of the directions isn't clear, here's a link to someone else's (that's also where I skeeved the pics from  :-[)

http://www.jkowners.com/forum/showthread.php?t=9516

On the bottom, gently pop out the blank plastic piece that rises directly from the transmission tunnel. It is just held in by clips. This will expose the bottom bolts.

By the way...there's not a pile of extra space behind that panel. It's a lot of fiddling and farting around to get everything back in, especially if you end up adding as much aftermarket wiring as I have. You will also want to be careful when you pull up that top piece. Your compass is attached to the bottom of it by two little bolts. If you remove the compass, please understand that it is very easy to re-install the compass backwards if you're not paying attention. No matter how many times you calibrate it, if it's installed backwards, it will tell you that you're driving North when you leave town for Lethbridge. :-[
« Last Edit: November 11, 2010, 06:48:26 PM by w squared »
I followed a rainbow out to a garage and found a leprichaun. The rainbow ended in a potted cactus on his porch, but there was no gold :(

Offline loreleir

  • Stocker
  • Posts: 12
Re: Removal of dashboard and centre console
« Reply #3 on: November 11, 2010, 09:40:16 PM »
Awesome!  Thank-you!

I also want to remove the panel that goes around my instrument panel (speedometer, fuel gauge, etc.) and my vents on both driver and passenger sides, and the panel below the steering column.  Basically take the whole dashboard and centre console apart.

As to the reason, it's purely cosmetic.  I'm having these parts 'hydro-dipped' and airbrushed.  A good friend of mine has recently become 1 of only 4 people in Canada to do this and it's practice / advertising for him.  So, as a good friend and supporter of his art and his company, have a look at www.chaotickustoms.com or on facebook www.facebook.com/chaotickustoms if you're interested in seeing what he does.

'10 Mango Tango Rubicon Unlimited

Offline w squared

  • Talks waaay too much!
  • Posts: 3400
  • Keamy Hungry!
Re: Removal of dashboard and centre console
« Reply #4 on: November 11, 2010, 09:59:17 PM »
Panel below the steering column pops out easily - it's just clips.

Vents are easy too. Grasp the bezel firmly with a finger or two inside the actual vent tube, and rotate about 1/8 of a turn. I think you want to rotate counter-clockwise, but don't quote me on that. It's been a little while since I took mine out.

I just looked at the site. That's a very cool process. I've seen it used to transfer camo patterns onto some high-end rifles. Not simple to do, but apparently the results are just outstanding.
« Last Edit: November 11, 2010, 10:02:51 PM by w squared »
I followed a rainbow out to a garage and found a leprichaun. The rainbow ended in a potted cactus on his porch, but there was no gold :(