Calgary Jeep Association

Author Topic: Finally decided to get creative with spare parts... my OBA project  (Read 5651 times)

0 Members and 1 Guest are viewing this topic.

Offline TL-Iguana

  • Talks waaay too much!
  • Posts: 1117
  • XJ - The Official TJ Rescue Vehicle
My new project :) Free compressor with a dead motor + AC System that has been in need of a recharge for 4 years, (that I would never use even if it was charged) = OBA Project!

So there you have it, this so far is my buildup! If anyone sees something that Ive done terribly wrong here please let me know! I don't want to put it all together only to find out that Ive made a drastic error in my judgement.


That shows A - the filter
B - Inline oiler, as the Sanden compressor needs to be consistently oiled
C - the input for the sanden will fit here.


This is my underhood manifold setup

A - Output from compressor into the manifold
B - Oil / Water separator to take the oil back out of the lines... hopefully :)
C - Check valve
D - This output will run to a fitting on the front of the jeep, at full tank pressure (120 psi )
E - Pressure switch set to 120 psi
F - Hard to see, but this will run to the tank in the back.


The tank! I'm gonna modify the rear bracket to fit snug up against the side of the jeep, where i will possibly fab a bracket to hold it there, or just strap it down. I have a nice bulkhead style fitting to run into the floor behind it that will fill the tank. Under the Jeep, where the bulkhead will be I am also going to T off to the rear where I will plumb a quick release fitting inside the gas cap which will also run at full tank pressure. Off the tank manifold I have a blow off valve for safety, (140psi) and then also those 2 regulated outputs. I'm going to reserve one of those for running basic tools if needed, and the other I may end up removing the quick release and adding another fitting to plumb out back of the jeep as well so I have one at full pressure, and one regulated.

In the cabin I intend to put in a pressure gauge up on the dash with the switch to power a relay going to the compressor.

Just my ideas so far, I haven't plumbed anything through the XJ yet :D
« Last Edit: February 10, 2011, 11:38:02 PM by tliguana »
I did a Google search for "hot trannies" but nothing came up about oil coolers  :o

Worrying too much about mpg with a Jeep is similar to worrying about your sister's virginity. An ok thing to be concerned about but...

'01 XJ on 35s, '11 Jk DD

Offline Waytec

  • Talks waaay too much!
  • Posts: 1972
  • not all there
Re: Finally decided to get creative with spare parts
« Reply #1 on: February 05, 2011, 11:46:09 PM »
This is starting to look like a set up I have seen befor.
Why does your Jeep say Toyota on it?
The obstacle is the path.

Offline TL-Iguana

  • Talks waaay too much!
  • Posts: 1117
  • XJ - The Official TJ Rescue Vehicle
Re: Finally decided to get creative with spare parts
« Reply #2 on: February 05, 2011, 11:52:20 PM »
I did like that setup you had in the XJ. Did you find the hand throttle made a big difference?
I did a Google search for "hot trannies" but nothing came up about oil coolers  :o

Worrying too much about mpg with a Jeep is similar to worrying about your sister's virginity. An ok thing to be concerned about but...

'01 XJ on 35s, '11 Jk DD

Offline Waytec

  • Talks waaay too much!
  • Posts: 1972
  • not all there
Re: Finally decided to get creative with spare parts
« Reply #3 on: February 06, 2011, 12:08:07 AM »
yes it did. I got the hand throttle from a bike shop.
the faster the engine is running the faster the pump is running = more air faster.
the hand throttle is handy on steep trails where you have to stop and go agen or are on the brake and clutch at the same time.
Why does your Jeep say Toyota on it?
The obstacle is the path.

Offline TL-Iguana

  • Talks waaay too much!
  • Posts: 1117
  • XJ - The Official TJ Rescue Vehicle
Re: Finally decided to get creative with spare parts
« Reply #4 on: February 10, 2011, 11:37:08 PM »
Well, after much deliberation and in receiving some really good advice and tips from Waytec, I have decided to change my approach to all this. I have now moved the pressure switch to the tank, as well as the check valve. Up front comes the fun stuff! I have decided now to convert my Sanden compressor to run on grease. A lot of reading has given me enough confidence that if I kill it, then its easy and cheap enough to replace with another one. Now the fun begins!

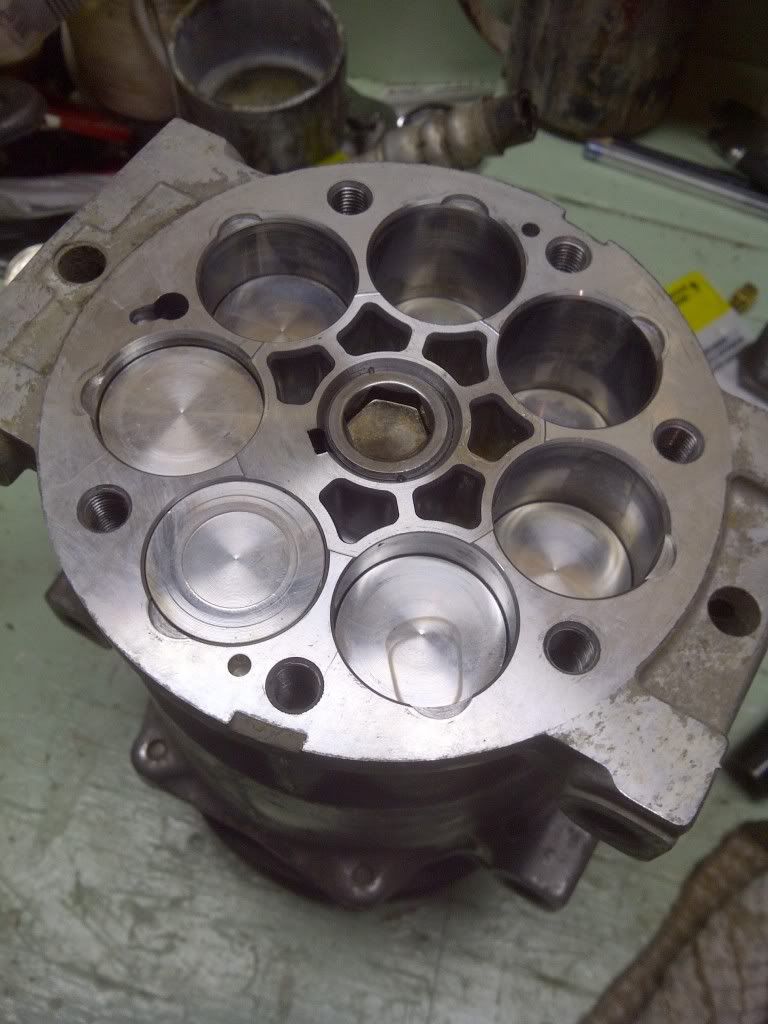
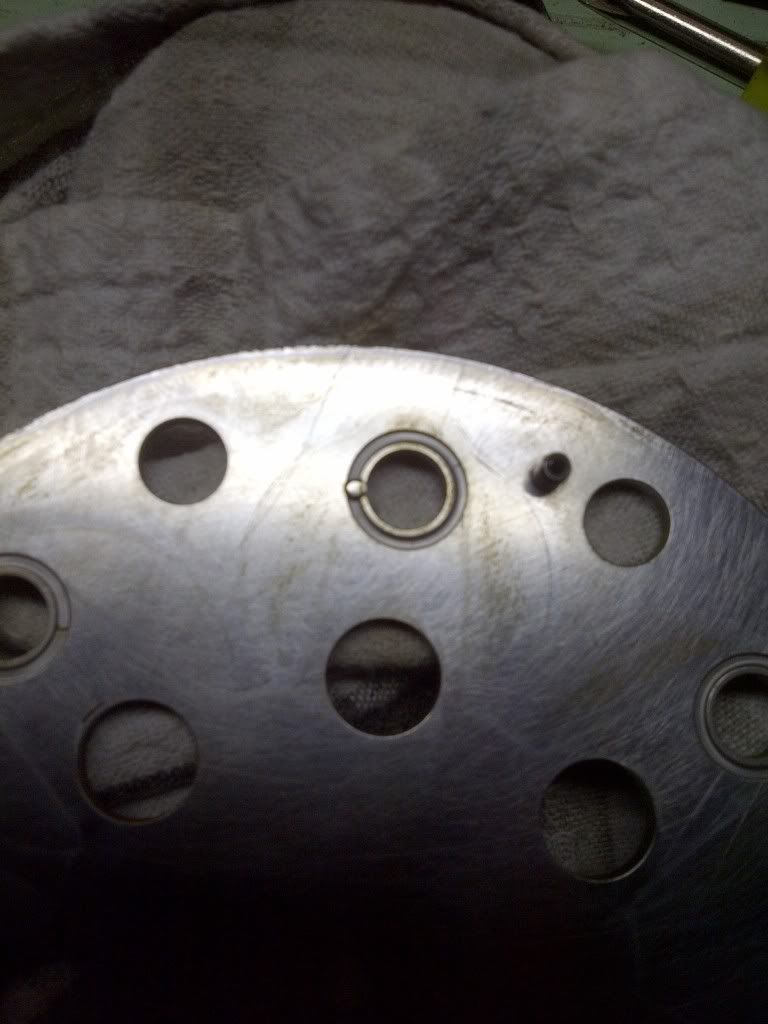
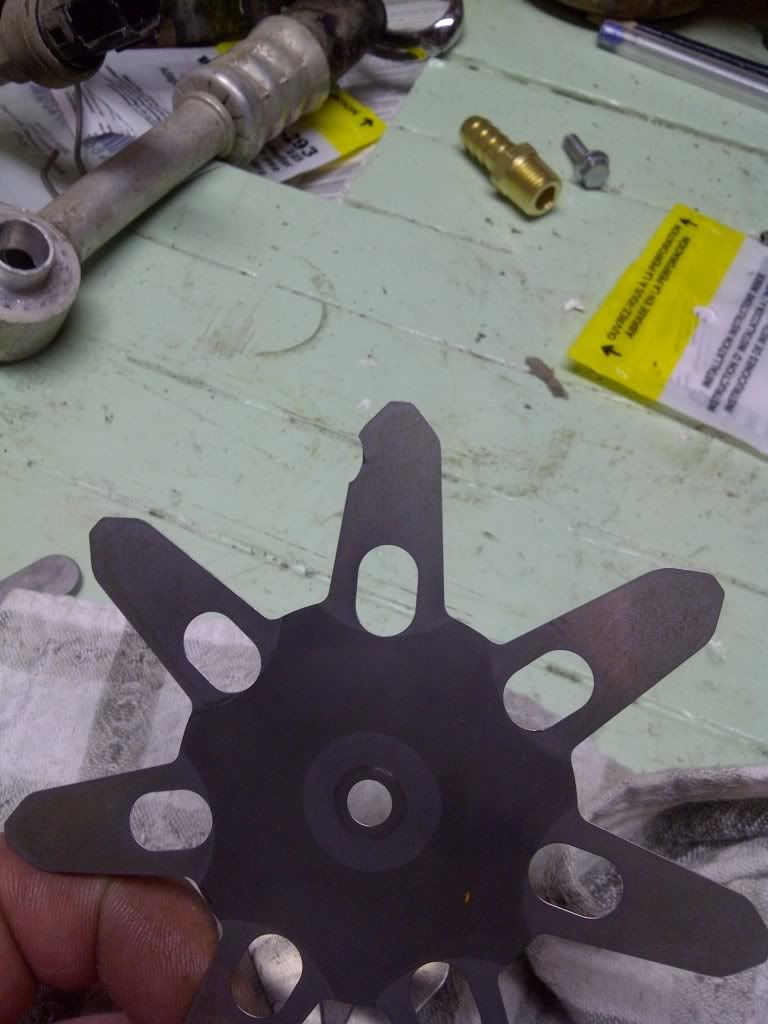
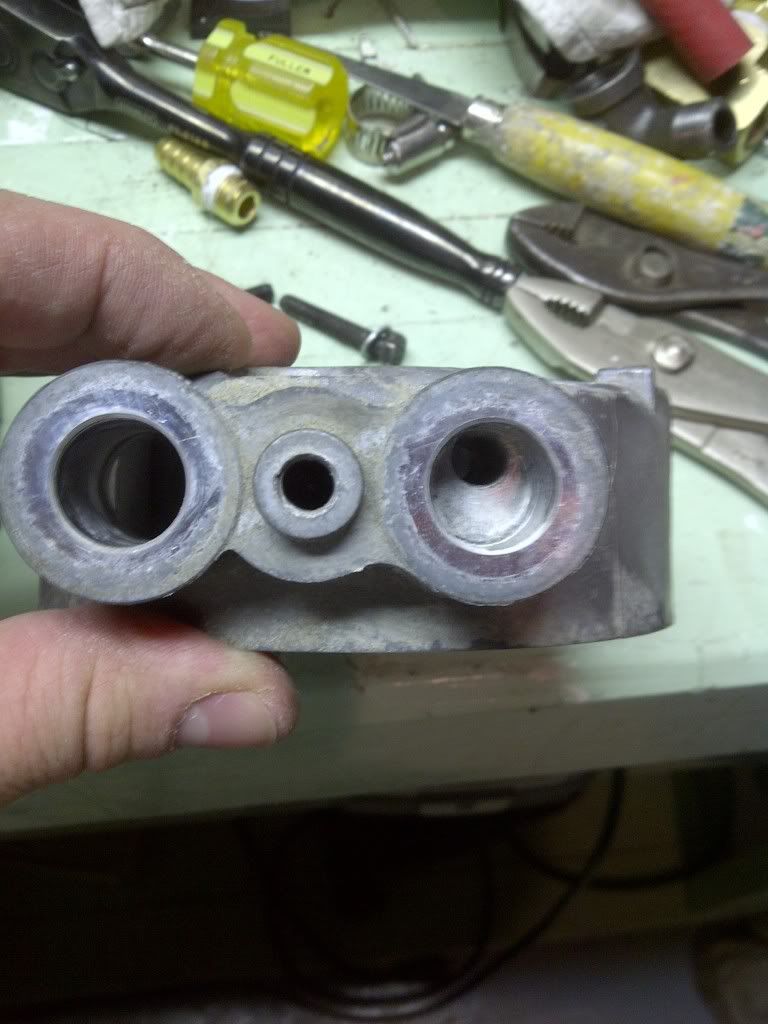
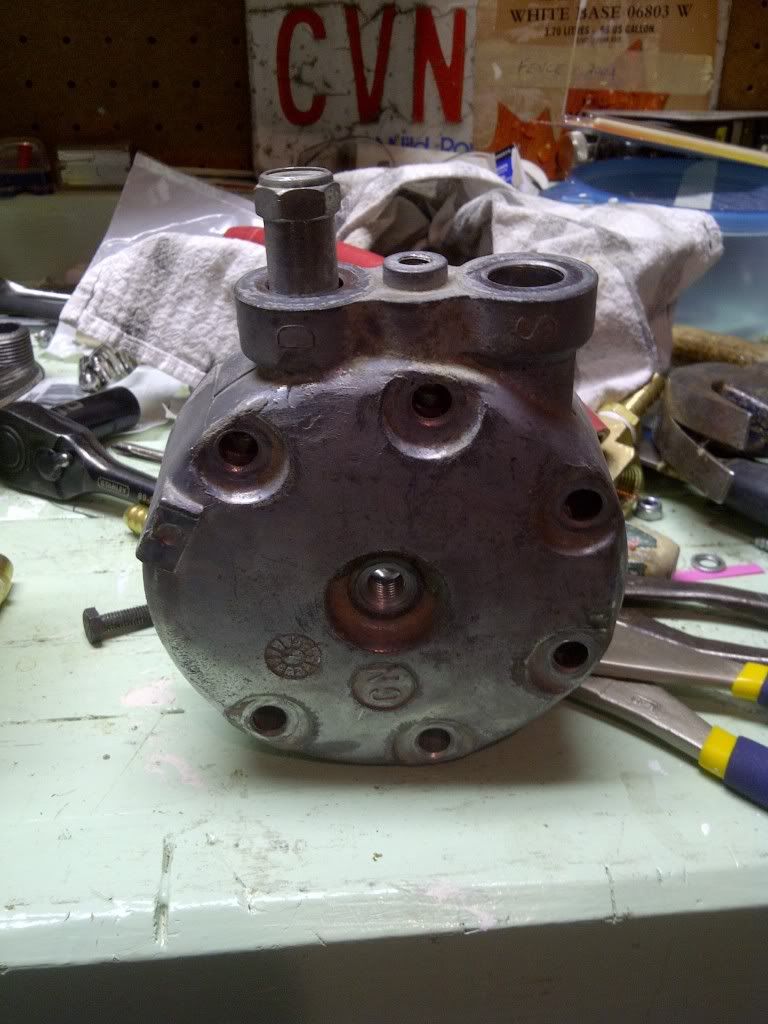
I went to the wrecker the other day to look for a spare compressor that would fit so I could at least work on it and keep my jeep drivable. I found a suitable one on a 98 that was in a front end smash, but the engine was still intact, and it even had a brand new alternator on it! Double score! I have finally had a chance to take the compressor apart to begin the conversion and found that it was a darn good thing that I did, as at the top of one of the pistons, there was a small piece of metal that must have come loose, or was dropped in there from the factory when it was made. It wedged between the head and the flapper valve, in turn damaging the piston and breaking off a piece of the flapper valve :( This is however easily replaced from what I can tell, and when I finally take my old compressor out of my jeep, I will likely just rob the parts that I need from that one to make one good one again. Now all I have to do before I can switch to grease is to drill out and tap an oil passage inside the compressor to keep the grease inside it and out of my air lines, and then fitting some standard NPT fittings to a non standard compressor head! I scratched my head over this for a few hours tonight, but I think I have figured this one out. The tapping of the oil galley is fine, and I will just thread lock a small set screw inside it to block most of the grease from getting out. The other part I had to think about though was how to get a standard air fitting to mate to the head. For the intake side, it doesn't seem like it will be a big deal as there is no pressure against it, so I'm just going to put a filter onto the end of the original air line. However the discharge side will prove to be a problem.. This side seems like it is too shallow to get enough threads out of a tap. After staring at the head for about an hour, and enjoying an ounce of 15yr old single malt, I finally came up with an idea! On the back of this one there is a pressure relief valve, which my XJ does not have! To my delight, it is a standard thread that I already have a tap for. I think tomorrow I am going to just drill out the center hole where that pressure relief was, and tap that to 1/4 NPT for the discharge fitting, and then up top on the old discharge port, I will cut off and grind down the o-ring pad, and re-tap into the existing hole to take the pressure relief valve! Problem solved! I don't have to drill any more holes into the head, or block any other ports. Thankfully, with this head being slightly different than the one on the jeep, it just worked out better!

So far so good! Also managed to finally get the tanks mocked up in the back of the jeep, where they tuck in nicely out of the way into the rear corner. I hope to get some brackets fabbed up to attach it securely, and then I can work on more mock up, and plumbing the lines!

More pictures of the progress thus far!

This shows the damaged piston, from the manufacturing defect...

The small piece of metal that was stuck to the head under the flapper valve

And the broken flapper valve

Here is the head that I will modify in a few days time, removing the o-ring pad on the right side, and tapping that small hole to accept the pressure relief

And the mock up of what I plan to do after its tapped. That center hole will be tapped to accept a standard NPT fitting

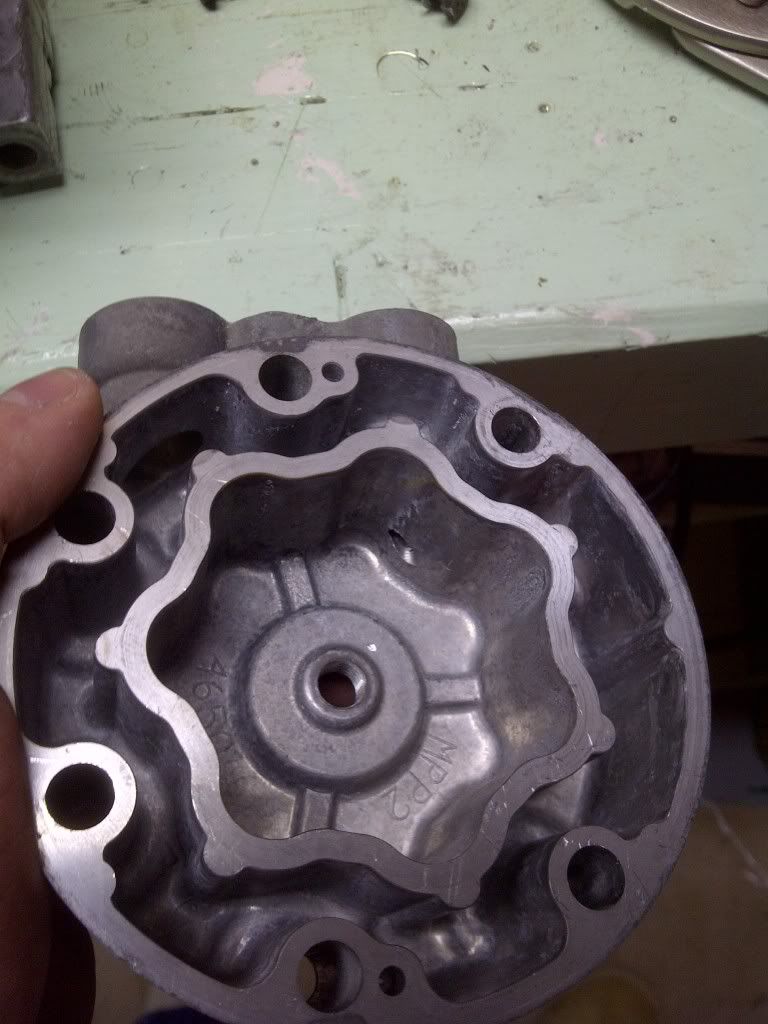
This is the inside of the head, The outer chamber is where the suction occurs for intake, and the center chamber is discharged through the hole in the top right. The center was originally the pressure relief, but that will be swapped out for a more simplistic approach to plumbing standard fittings to it.
I did a Google search for "hot trannies" but nothing came up about oil coolers  :o

Worrying too much about mpg with a Jeep is similar to worrying about your sister's virginity. An ok thing to be concerned about but...

'01 XJ on 35s, '11 Jk DD

Offline Knox

  • That CB Yapper
  • Posts: 649
Re: Finally decided to get creative with spare parts... my OBA project
« Reply #5 on: February 11, 2011, 08:18:34 AM »
how will you power the compressor? Are there issues running a 120v compressor off an inverter?
2003 TJ
"Your TJ has the aerodynamics of a brick"
"if you lose the stick, chances are you'll lose the jeep......"

Offline murray195

  • Budget Lift
  • Posts: 109
  • No such thing as secrets... just useful info
Re: Finally decided to get creative with spare parts... my OBA project
« Reply #6 on: February 11, 2011, 09:35:19 AM »
Quote
Posted by: Knox 
Insert Quote
how will you power the compressor? Are there issues running a 120v compressor off an inverter?

I believe the compressor is just the factory A/C compressor that runs off your serpentine belt... no 120V needed which is one reason why this is a fairly popular route to take. It seems like less work than the York mod  :) No messing around with brackets and what not.

Offline TL-Iguana

  • Talks waaay too much!
  • Posts: 1117
  • XJ - The Official TJ Rescue Vehicle
Re: Finally decided to get creative with spare parts... my OBA project
« Reply #7 on: February 11, 2011, 10:03:09 AM »
I believe the compressor is just the factory A/C compressor that runs off your serpentine belt... no 120V needed which is one reason why this is a fairly popular route to take. It seems like less work than the York mod  :) No messing around with brackets and what not.


Exactly!

Its already there under the hood, and has never held an AC Charge since I bought it. The sandens apparently put out about 9fm (probably measured in the vacum of space and without any other factors such as friction) but for my purpose, whatever it puts out will be fine. The pressure switch is just that. Its a switch. It doesnt care if I run 12v dc, or 240ac, so hooking that up to the battery will also make no difference :)

The compressor I took apart in the pictures is from a 98XJ, but the sanden compressors are common on hundreds of different vehicles, which makes them a good choice for onboard air. The Yorks are also common, but are absolutely huge! I just wanted a somewhat simple way to have an "almost unlimited" amount of air, and the Sanden compressor also runs at 100% duty cylce, so theres no need for it to cool down unlike electric ones.
I did a Google search for "hot trannies" but nothing came up about oil coolers  :o

Worrying too much about mpg with a Jeep is similar to worrying about your sister's virginity. An ok thing to be concerned about but...

'01 XJ on 35s, '11 Jk DD

Offline stroker sahara

  • UberWheeler
  • Posts: 361
Re: Finally decided to get creative with spare parts
« Reply #8 on: February 11, 2011, 01:41:15 PM »
yes it did. I got the hand throttle from a bike shop.
the faster the engine is running the faster the pump is running = more air faster.
the hand throttle is handy on steep trails where you have to stop and go agen or are on the brake and clutch at the same time.

Hand throttles also work great for burnouts!
If you want to run with the big dogs you have to be able to pee in the tall grass.


1989 YJ SOA, 36" SX, 4.6 Stroker...

Offline TL-Iguana

  • Talks waaay too much!
  • Posts: 1117
  • XJ - The Official TJ Rescue Vehicle
Re: Finally decided to get creative with spare parts
« Reply #9 on: February 12, 2011, 12:03:57 AM »
Hand throttles also work great for burnouts!

This of course is irresponsible! ;) Not that it matters, my XJ is an auto :(


Anyways! I did get a chance to sneak away from my best friends wedding today to work on my jeep, he of course was more than willing to help where he could as well ;)

Not much more progress made, but I did manage to drill and tap out what I needed to.

Because the Sanden was meant to always run with oil in the system it had this nifty little oil passage, that went from the back of the compressor up to the head. This hole is tapered, so I had to drill it almost 3/4s of the way through and then followed up with a tap. I also drilled out that pressure port in the back of the head, and ground off half of the o-ring flange to move the pressure port up top. The hole in the center of the head is now going to be my outlet from the compressor, and the top port is for the stock pressure relief that came with the pump. So far, this is all going according to plan! The only expensive part so far was the 1/4" NPT tap... at just about $50.00, it will likely be another addition to the only used once drawer in my tool collection  ::)

This is the set screw I needed to fit into the tapered oil return hole to completely seal it off.


After cutting and grinding down the o-ring flange I also had to enlarge the port into the discharge section of the head. The hole was also tapered so after drilling it straight through, I followed with the matching tap for the relief valves thread.


After drilling out the taper and tapping the oil return this is the set screw finally locktited into place. Now (fingers crossed) there should only be a minimal amount of grease coming up from the bores into the discharge section of my compressor, and out into the lines.


And finally, here is the head after being ground down, and tapped out for the relief valve, and NPT fitting.


So far so good! Moving along slowly but surely. Now to order the new flapper valve and gasket kit to put it all back together...  :D

I did a Google search for "hot trannies" but nothing came up about oil coolers  :o

Worrying too much about mpg with a Jeep is similar to worrying about your sister's virginity. An ok thing to be concerned about but...

'01 XJ on 35s, '11 Jk DD

Offline TL-Iguana

  • Talks waaay too much!
  • Posts: 1117
  • XJ - The Official TJ Rescue Vehicle
Re: Finally decided to get creative with spare parts... my OBA project
« Reply #10 on: February 16, 2011, 11:00:46 PM »
Been sick for the past few days and really Ive had no drive to push forward on this project, but today seemed a bit better so I made a bit more progress! I ended up cashing in a favor at a hose supplier here and got some steel braided line crimped up to put out of the compressor head, which will fair better with the heat and oil under the hood I think. I also picked up a nicer fitting to attach on the head for the output that swivels, and an assortment of brass bulkheads to make running the fittings up through the floor a bit tidier. Back at home, I drilled out and tapped a new hole for a grease fitting, on the opposite side of the drain plug, and I finally reassembled the compressor and greased it to death. I do understand that a 1/8th" grease fitting will fit nicely in the pre-tapped drain plug port, but I thought that my adding a nipple on the other side, If I wanted to pack the unit with fresh grease, it should be easy enough to squeeze it till all the old stuff comes out the other side... At least that was my thinking. For the time and labor to do it, it was worth it in my opinion, though I'm sure I will never get to the point of needed to fully exchange the grease out of it. The only hitch with the whole process today was reassembling the clutch pack and pulley, as once it was together, the pulley bearing decided to seize up  >:( I swore loudly, and it seemed to help, but it was beyond repair. So, off to the wrecker I went and bargained with him to give me another one since the first one failed. This one after being thoroughly cleaned of of R12 residue, received a generous greasing and was installed. After double checking everything, I gave it a spin, and it seems to work great! I am receiving suction in the correct port, and pressure off the other! Hopefully this weekend I will be heading out to the farm, and into a heated shop to actually install everything! Of course, here are some more pictures of the progress thus far!


The fancy new 90 degree grease nipple, installed opposite the drain port


This is the newly modified head, now installed, with the old line that I cut the hose off of. I will be fitting a filter to the end of this for the intake portion. This also shows that fancy steel braided line!


And 3 shots of the greasing job. I'm sure theres enough in there to last its lifetime, but with no real manual on how to do this, I did what I thought would work. If a little pumps out, then so be it. I intend to still run a coalescing filter before the tank to capture any that does make it through the system. I also did wipe the tops of the pistons off before putting the head back on as they don't require any grease to be on them, just what is coating the cylinder walls.


I did a Google search for "hot trannies" but nothing came up about oil coolers  :o

Worrying too much about mpg with a Jeep is similar to worrying about your sister's virginity. An ok thing to be concerned about but...

'01 XJ on 35s, '11 Jk DD

Offline TL-Iguana

  • Talks waaay too much!
  • Posts: 1117
  • XJ - The Official TJ Rescue Vehicle
Re: Finally decided to get creative with spare parts... my OBA project
« Reply #11 on: March 03, 2011, 09:47:05 PM »
Well, its finally done and installed for the most part! It even works!

I managed to find some time finally to drive out to the farm where my jeep still fits in a garage :D

I ended up drilling a hole in a perfectly good floor pan under the passenger seat to run a brass bulkhead through and then plumbed in the remaining fittings to attach to the tank. The electrical was very straight forward as well. For now, I will just be leaving the power switch where it is, (mounted into the pressure switch housing) as I didn't feel any need to have it up on the dash at this point. I may change this in the future, and integrate the power switch and pressure gauge into the dash, but for now its nice and neat where it is. Then I tackled the wiring where the hardest part was taking all the trim out of the inside to run the wiring to the back from the battery. It was very simple to hook up when fished though. Fused power to the switch, which in turn provides power to the pressure switch. I added a simple 30amp bosch style relay, which also has fused power going to it, and then out to the compressor clutch. The pressure switch is wired to the switched power on the relay, so when the pressure in the tank drops below 100psi, it uses the relay to activate the compressor clutch, and fills the tank back up to 125psi. This is completely adjustable, but for my purposes, (and the gauge redlining at 125) I have left it set where it is. I tested the system with the jeep at idle, and it only took about 120 seconds to fully pressurize my 5 gallon tank! I may still consider the hand throttle idea to put my RPM up into the 2000 range, just to make it a bit quicker in filling, but really for the time it took I was quite happy with this. It pumped up the flat tire on my quad in a matter of seconds, and my Jeep tire in half the time that it used to take with an electric compressor! I'm really impressed so far! I took a video of the system in action, just because it was pretty exciting to me at least to see it all come together and work as well as it does :) Of course I have a few more pictures of what I accomplished, and by no means am I done with this thread :D Next up, I still have to put the air filter on as you can see, and I am going to make some nice welded brackets to hold the tanks to the body inside. I am also really considering putting the main pressure gauge and switch into the dash, and installing an air fitting on the inside of my gas door which would allow me to run the system without having to open the back door all the time. All in due time though, and perhaps when its a bit warmer outside :) Even in the heated shop, the cold cement floor was no fun to work off of.  ::)

It doesnt even phase me anymore when it comes to putting holes in my jeep. At first it made me cringe, now its just all part of ownership ;)


And finally filled in with some silicone around the bulkhead, and some pipe dope on all the fittings!


The freshly grease converted compressor back in its spot under the hood, with the new steel braided hose attached


and this is the pressure switch housing that I cut into to install the main power switch to the system. This of course may change, in which case ill replace the housing to keep it looking tidy.


Last but not least, this is the system in action! Idle RPM, from 0psi to 125, and back to 0. I'm not the greatest when it comes to HTML code so I don't know how to embed this in the post correctly, so just click the picture and it will take you to the video  8)


I did a Google search for "hot trannies" but nothing came up about oil coolers  :o

Worrying too much about mpg with a Jeep is similar to worrying about your sister's virginity. An ok thing to be concerned about but...

'01 XJ on 35s, '11 Jk DD