Calgary Jeep Association

Author Topic: Seat Heater Install  (Read 1796 times)

0 Members and 1 Guest are viewing this topic.

Offline JJonesee

  • Budget Lift
  • Posts: 143
Seat Heater Install
« on: January 01, 2012, 09:52:07 AM »
"I" received a heated seat kit for Christmas. Wife ordered the Check Corporation kit from Quadratec, had it shipped to our relatives in the states. Check makes the factory kits for Chrysler, so there was not a doubt on quality or fit.  Essentially Heated seats are just a long resister encased in a fabric insert, that is sandwiched between the foam and the seat cover.  They are controlled by a relay and thermostat to prevent fires.  That said, the pads see quite a bit of movement from passengers.  Low cost kits will cut corners on the seat pad, and will fatigue and fail sooner.

So considering:
 - Risk of fire
 - amount of work to install only to have pre-mature failure

In other words, dont cut corners on a kit..  there are lots of good kits out there, and lots of low quality knock offs.  If your going to invest the 4 hours to install, you only want to do it once.

http://www.quadratec.com/products/14159_101.htm

On to the install:

Remove seats to find 6 yrs worth of junk:


I removed the entire seat/slider/brkt assembly.  This will take a T47 Torx bit that is the devil. Just take your time.


I left all the brackets on the seat.  Start with the seat bottom, and remove the long clip for the cover in the front, followed be each side clip. I used a small screwdriver to start the clip removal.  Its tough, but can be done.


Start to fold the seat cover back over the foam and you will encounter hog rings connecting the front to back side bolster divider to the seat.  I used to sets of needle nose pliers to open the hog rings. (There is also a velcro strip that runs left-right. Separate easily so you dont tear the velcro from the foam.

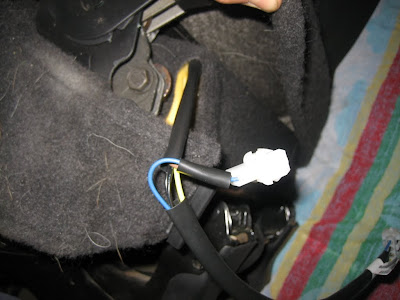
Slide the seat heater into place. (Dont pull the paper back yet)  Feed the power connector through the back of the seat. (Remember to exit the side of the seat towards the center console. NOTE: the kit includes enough cable to route the cable around the interior 3-4 times..)


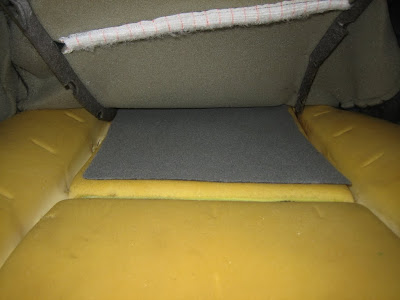
Once satisfied with the placement, fold the seat heater back and start removing the paper backing from the rear of the seat forward.  The kit is very clear that ALL paper must be removed from the back of the element.

Note: Pad must be to the rear of the lower seat cushion, to avoid the velcro strip.

I used high tensile zip ties to replace the hog ring clips.  I have used new hog rings in the past, and I think zip ties work better.


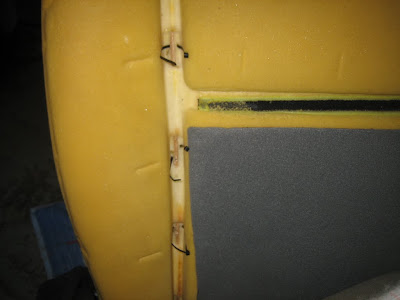
Take your time, and work your way back to front.  I tighten the zip tie and reach in and cut the excess.  Then roll the zip tie down so the cut end is facing away from your rear. (Similar process used for hog rings)  The rods in the seat cover need to have the ends contained in the pockets on the cover, and are free to slide.  Just make sure they end up the way you found them.

Pull front and side clips through the brackets, and clip into place.


« Last Edit: January 01, 2012, 10:28:19 AM by JJonesee »
06' Rubicon LJ
52' M-100
82' Scrambler x 3

Offline JJonesee

  • Budget Lift
  • Posts: 143
Re: Seat Heater Install
« Reply #1 on: January 01, 2012, 09:52:34 AM »
Move on to the seat back.

There are 3 clips located at the bottom of the seat back where the cover clips to itself.


When you start to remove the cover, you will find the rods are contained by hog rings in one location, remove the rings and continue to pull back the cover.


Place pad, route wires , again paying attention to which side the wire exits. Pull paper, starting at bottom and work your way up to stick the pad.


Again I used high tensile zip ties to replace hog rings.


Cut/roll zip tie..


Replace cover, and clip the 3 clips on the bottom.

Route the wires, connect back to seat, and secure to the frame.


Now repeat for the other seat. (Sorry some of the photos are from the driver, some are from the passenger.  The process is the same, just I routed the wires toward the center console.)
« Last Edit: January 01, 2012, 10:30:33 AM by JJonesee »
06' Rubicon LJ
52' M-100
82' Scrambler x 3

Offline JJonesee

  • Budget Lift
  • Posts: 143
Re: Seat Heater Install
« Reply #2 on: January 01, 2012, 10:27:03 AM »
Re-install the seats.  Its important to have the seats in to check for proper routing of the wiring.   (I took the time to also clean out the floorboards)

Wiring is straight forward.  There is a lead wire with connectors that connects the seat  to the control module.  I routed them under the center console, with the connector exiting just under the cup holders to each seat.  I checked for full movement of each seat.  I mounted the module just in front of the 4wd shifter, out of site behind the console where the CB is mounted.

I removed the lower switch panel, and mounted the switches using a step bit.


The power is supplied by using a "T" connector on the cigarette lighter.  Route this to the control module. Note: connect to the port that only has ignition on power, not the "power port"


The switch leads supplied are long enough to mount the switches on the spare tire, so I cut them and re-crimped female spade connectors.


Its tight behind the switch panel, so carefully connect the switches according the the install manual.  Re-connect all factory connectors. Its a good time to place the key in the ignition and do a test.  If all is well replace all dash components.

The heaters work great.  The heater in my jeep has never been a problem, but the seat heaters are hot faster than the heater is. 
06' Rubicon LJ
52' M-100
82' Scrambler x 3

Offline Mud

  • Budget Lift
  • Posts: 138
  • Chad
Re: Seat Heater Install
« Reply #3 on: January 01, 2012, 08:02:03 PM »
I see you are adjusting to the Canadian winter any way you can! Nicely done Jason.
JKU-R, RK 5.5 Lift, 36" IROK, WARN 8274,  CB, Genright tire carrier, Poison Spyder Armor, Warn Bumper, Viair
RIP 2001 Orange TJ

Offline JJonesee

  • Budget Lift
  • Posts: 143
Re: Seat Heater Install
« Reply #4 on: January 01, 2012, 10:37:17 PM »
Anything to make it easier.. 

I have to work on hers every now and then, so I can work on mine.
06' Rubicon LJ
52' M-100
82' Scrambler x 3

Offline birdo

  • Baby Wheeler
  • Posts: 86
  • 99 TJ
Re: Seat Heater Install
« Reply #5 on: January 04, 2012, 09:18:17 PM »
Nice tutorial. I have aftermarket heated seats in my rig like yours. Love 'em!
John Bird
Okotoks Alberta
1999 Jeep TJ Sahara
Desert Sand
Hercules 31s on Ion Alloy Rims
Rough Country Suspension Lift Kit
Custom Truck Bed Liner Paint Job (heh, heh)
Some Cheapo Clarion Stereo
Heated Seats, Air-Con, Cruise
230,000 kms

Offline mike s

  • UberWheeler
  • Posts: 361
  • Good times!
Re: Seat Heater Install
« Reply #6 on: January 05, 2012, 07:35:15 AM »
Great tech write up, thanks.
'94 YJ, 2.5" RE, 1"BL on 35"s, 8.8 w 4.88
oldEnuff2NObetter

but still can't help myself

Offline JJonesee

  • Budget Lift
  • Posts: 143
Re: Seat Heater Install
« Reply #7 on: January 05, 2012, 03:50:28 PM »
no problem guys.

I will admit - I was bitter about the price.. But I think its becoming one of the best things I have done to the LJ..

I did research them right after I came to Canada.  Kits range from $80 to $300..  I dont know what the shops charge to install - but its a fair amount of work.

To be honest I have never done it since I would rather swap out the seats for heated mastercrafts.  Her justification is I can still sell these when I upgrade..  (As long as I sell them in Canada..  I dont think there is much demand in Texas)
06' Rubicon LJ
52' M-100
82' Scrambler x 3

Offline binare

  • That CB Yapper
  • Posts: 771
Re: Seat Heater Install
« Reply #8 on: January 05, 2012, 04:59:25 PM »
Do they make you feel like ya fumed your pants? Its bad enough when it happens for real.